Fence made of picket fence is one of the most popular types of fencing, with the help of which the suburban area is ennobled. The main thing is to implement it correctly. Such a fence has gained popularity due to a number of advantages, the main of which are the low cost of construction and appearance.
Materials and tools
Installation of a wooden fence does not require special devices, if we are not talking about combined structures consisting of several different types of materials, such as stone or brick. Bearing vertical and horizontal supports for the fence can be made of wood or metal.
To install the fence you will need:
- wooden beam 50x50 mm;
- wooden beam 20x40 mm;
- nails or screws;
- antiseptic;
- paint and varnish material.

A square beam is needed for the manufacture of vertical supports, and its length is planned in accordance with personal wishes: everyone determines the height of the future fence for himself.
The support is dug into the ground by at least half a meter, so 50 cm should be added to the desired height of the element for the fence.
A beam of a smaller cross-section (20x40 mm) is designed for horizontal reinforcement of span spans. Its quantity will directly depend on the length of the installed fence. As fasteners, nails or self-tapping screws are suitable. The second option is preferable, because the self-tapping screws do not loosen during the operation of the structure.
Fasteners need to be purchased from galvanized metal, which does not rust from exposure to atmospheric phenomena.
There are a lot of antiseptics and paints and varnishes on the market. It is necessary to choose the means intended for external works. Of the tools you need a hacksaw for wood or a jigsaw. If you nail the planks with nails, you will need a hammer, and it is better to fix the screws with a screwdriver. Useful shovel for mounting support posts.

Manufacturing technology
A step-by-step scheme of assembling a picket with your own hands will help to organize and carry out the work from start to finish.
- At the first stage, it is necessary to properly prepare the wood: all natural material must be impregnated several times with an antiseptic using a regular paint brush. The process is rather laborious, but it cannot be ignored. Such a measure will help protect the tree from environmental influences, protect it from decay, and extend the service life.
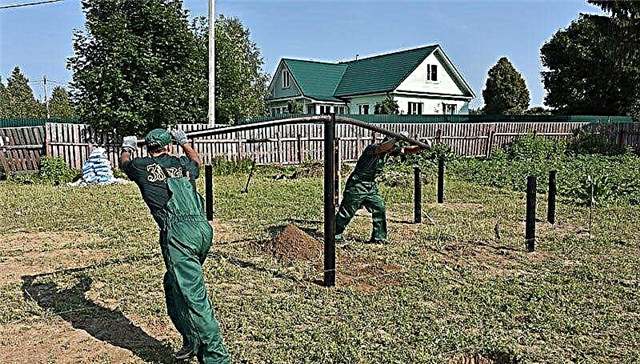
- Now you can begin to install the supports. We start work with marking places for their installation. In places where the fence changes direction (at the corners), we install pegs and pull a strong rope between them. Then you need to calculate the number of supports. To do this, measure the distance between the pegs and divide it into equal intervals, the length of which does not exceed 2 meters. The obtained value will be a step between the supporting poles, and at the place of their installation it is necessary to dig holes, taking into account the fact that the support should go into the ground at least half a meter below the freezing point. For a long and reliable service, the supporting structures are wedged with large gravel and compacted with earth. Laying the roofing material in the holes dug for the columns helps to increase the period of use of wooden supports, and the supports themselves are wrapped with the same roofing material in the places where they are buried in the ground.
- In the third stage, transverse guides for the fence are usually mounted. The main thing is that each vein is located strictly horizontally. It is easy to control the construction level. The horizontal supports are mounted in two places (at the top and bottom of the fence), however, in the case of a high fence, an intermediate guide will have to be installed. The veins are fixed to the vertical supports of the picket with self-tapping screws or nailed.
- The final step will be to install the wooden fence planks directly on the fence. The longest, but very simple process is to ensure that each shtaketin is screwed strictly vertically at regular intervals. If you pull the thread on the lower edge of the shtaketin, this will ensure one level of their placement.

At the fourth stage, the assembly process ends - the fence from the wooden fence is now ready for use. It remains to paint it in any chosen color, however, many masters additionally decorate the hedge with the help of simple tricks. This applies to the design of the upper edge of the shtaketin, which is given a certain shape.
Fence sections can be made in the form of a wave or arc. To do this, markings are applied to the fence, trimming is done according to the template. Shtaketins are sharpened on both sides in the form of a sharpened pencil - this will protect the compound from unauthorized access.
Often there are picket fence fences with carved planks - we are talking about the carpenter’s creative approach. You can’t call such a job simple.
Alternative to wooden poles
No matter how future supports are prepared and processed, wood is inferior to metal in durability. If you want a wooden fence from a picket fence to last a long time, and its service life is not limited to 15 years, it is better to use a metal base, which is mounted in the same way, except for a few points. The columns are made of a metal pipe with a cross section of 40 mm, fixed in the ground with concrete mortar.
To ensure optimal adhesion of the bearing element with concrete, reinforcement trim or metal plates are welded to the bottom of the vertical supports.

Horizontal veins are made of a metal pipe of smaller diameter and welded between the vertical supporting elements, monitoring the horizontal placement with the help of a level. Then each shtaketin is fixed on a previously constructed metal frame with pointed self-tapping screws. It will turn out a wooden fence, but reinforced with a metal base.
Even if shtaketins become unusable over time, they can be replaced, the supports will remain the same, and this is a cost savings.

The wooden picket has many options, and brickwork can be used as a base here, which in combination with natural wood gives a special effect. Instead of bricks, if funds allow, lay spans of stone. Such a massive structure will require a foundation. And this is a more laborious process.